This guide assumes familiarity with the basic mechanics of the game. If you’re completely new to Tangaria, please check out the Tutorial or just start playing, to get into the dungeon and try, well, whatever seems to be prudent. You’ll probably die rather quickly, but the following will make much more sense to you if you have just a little actual gameplay experience.
Race and Class
The one and most important thing you need to get in your head is that you can’t possibly kill every monster on every level. Think of the game as forays into the dungeon from which you want to return with cool stuff; think of the shallower levels as obstacles you need to overcome on your way deeper into the dungeon; or whatever you like. Just never-ever think of it as a killing spree.
The next point is that you don’t need to fight any particular monster (other than the big two). Yes, there might be a rather impressive hoard in that vault – but if the monsters guarding it are too many or too fierce, well, just give it a pass. Tangaria offers an endless supply of monsters and treasure and everything. There will always be another day – provided you live to see another day. Sometimes you just have to bug out and run for your life.
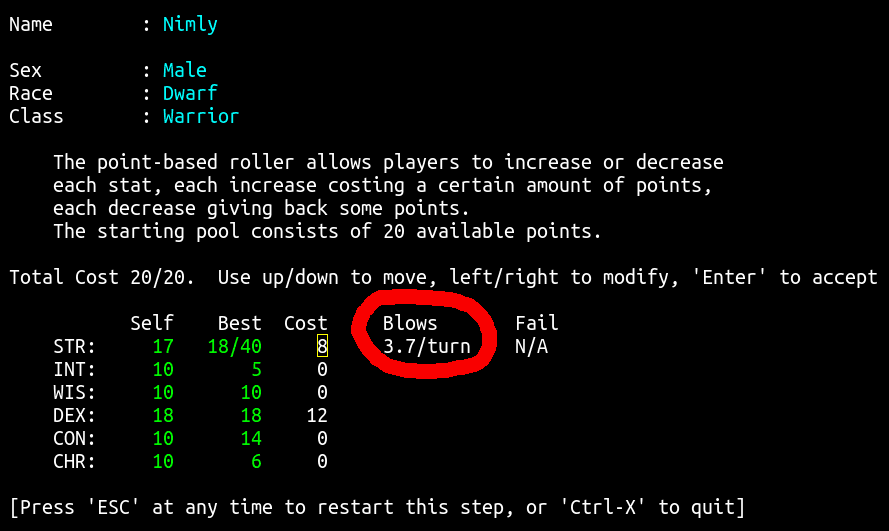
From this point, the guide assumes that you are playing a fighting class (Warrior or Monk) and strong race (Half-Troll, Dwarf, Half-Orc and others). First, use the ‘Point-based’ stats selection, and create a character with 3 or 4 blows (if you are new player – don’t pick a class/race combinations, like Dwarf/Ranger, unless you are ready to take that you will be able to have only 2 blows per round). You can see number of blows at character creation screen:
For all new players it’s highly recommended to start with ‘forgiving-mistakes’ class – warrior. Warriors are relatively simple to begin with, and are less likely to be eaten by a pack of jackals. Otherway you will suffer (unless you are really hard roguelikish nut) disappointment cause of fast (and often) deaths. Tangaria is extremely hard game to master in the beginning, so don’t try to play magical class right on unless if you didn’t make to level 20 with melee class. If you don’t like to play a warrior, you may consider other melee classes: Monk (melee martial arts fighting), Unbeliever (warrior who is so strongly despise magic that could suppress it occurring around), and maybe Archer (non-magical glass cannon). In case if you relentlessly want some magic – try Rogue who can do some stealthy tricks and less fragile than other “magical” classes.
Considering race, I recommend to start as Half-Troll Warrior – it is perfect choice for a new player. Actually for warrior and other melee classes you can choose any race which has internal boni to STRenght and DEXterity so you will have high BpR (blows per round). The only exception to this rule is Dragon Monk which though starts with low STR/DEX – can breath fire which helps a lot early on; to be able to do it – get your dragon to level 5 and press y to breath and then ' to target closest monster. Don’t breath fire too often as you spend your satiation and HPs on it.
💡Another interesting option is Hydra Monk who can attack all surrounding enemies, though it make huge amount of noise and aggro everything on sight. It also could breath fire, but much later than dragon. Also please note that Dragon/Hydra should be played only as Monk class (at least for new players); as these races can not wield weapons, so they could only fight with martial arts.
So, first advice is to set your stats to get maximum blows (except for Dragon or Hydra which start with low stats at first, but get extra blows by level ups). If you have a class/race combination with good dexterity, select 18/10 dexterity, and then set your strength to 17 or 18. If you’ve decided to try Rogue – set your spell-casting stat (INT) to something low but usable (~12), and spend the rest on constitution. For a beginning character, constitution is least important, because it doesn’t add significant HP until well above 18.
For a melee character, the most important measure of power is how much damage they can do in a single turn. Consider the above CL (character level) 1 character with 3 blows from a Rapier (+7,+9), in a fight vs an out-of-depth Bullroarer, with no escapes, no ranged weapons, and no armour. On the face, they have no chance. However, if they can get in the first blow he in fact has a pretty high chance of killing Bullroarer in a single turn, and a almost guaranteed chance of frightening him.
Further, with full buffing (!Hero, ?Blessing, ?Berserk Strength; ! – means potion; ? – means scroll), you will be good for certain as this corresponds to a solid reduction in the chance of failure in a dangerous situation.
💡With proper preparation even a weak character has an almost guaranteed chance of killing Bullroarer, if you meet him at a distance (across a lighted room). An unenchanted longbow does decent damage with ordinary (unenchanted) arrows. However, flasks of oil do fine nominal damage when thrown with v key, and do triple damage vs fire-vulnerable monsters. Bullroarer hasn’t too much HPs, so even a small stack of oil will finish him off.
Example character (to see such table for your character – press Shift+C in-game)
Name   Nimly    Age          43      Self  RB  CB  EB   Best
Sex    Male     Height     4'3"  STR:  16  +2  +3  +0  18/30
Race   Dwarf    Weight  9st 4lb  INT:  10  -3  -2  +0      5
Class  Warrior  Turns used:      WIS:  10  +2  -2  +0     10
Title  Rookie   Game         13  DEX:  18  -2  +2  +0     18
HP     20/20    Player       30  CON:  12  +2  +2  +0     16
SP     0/0      Active        5

Level              1  Armor     [8,+2]  Saving Throw     29%
Cur Exp            0                    Stealth          Bad
Max Exp            0  Melee     1d4,+3  Disarm - phys.   52%
Adv Exp           12  To-hit     29,+4  Disarm - magic   30%
                      Blows   3.3/turn      Magic Devices     27
Gold              60                    Searching        13%
Burden       25.2 lb  Shoot to-dam  +0  Infravision    50 ft
Overweight -130.7 lb  To-hit     19,+4  Speed         Normal
MaxDepth     Surface  Shots   1.0/turn
Basic controls
Now it’s time to remember these dozen commands and you will be able to play more or less alrighty:
l look around (use arrows to navigate and press Esc to exit look mode)
i show your inventory
e list the equipment you are currently using
| (vertical bar) show quiver (projectiles will be added there automatically)
w wear, wield, or equip an item
t take off / stop using an item
g pick up an item
d drop an item
q quaff a potion
r read a scroll
R rest to restore HP/mana (after pressing R, press & and Enter to heal up)
T tunnel, dig walls, remove obstacles, chop trees
E eat some food; don’t starve but also don’t overeat!
Some additional notes:
- To run use
Shift+directionon NumPad or. >go down stairs;<go up stairs.- When start – don’t forget to
purchase Throwing Rocks and to usehto throw them to distant monsters. Or if you are strong enough, you may try to dig some cobbles in the dungeon, which makes more damage, but as they are more heavy – got less firing range. Remember that you attack monsters next to you automatically in melee. - To send a message to fellow adventurers use
:then type the message and pressEnter - Don’t forget to walk around only with NumPad to be able to move diagonally; using arrows you won’t get far.
- If you want to see full list of commands in-game – press
?for help or check Keyset section on website.
Macro is easy!
Sometimes in a battle you must to act fast. For example, to drink healing potion “Cure Light Wounds” you will need:
1) press q (quaff command). When you will do it, you will see this:
 2) now you need to select proper potion index; in this case – to press
 c
The problem is that if contents of your inventory will change future (eg you will find new potions) – c index may correspond not to “Cure Light Wounds”, but to other item. So you won’t be able to drink potion fast, you will have to look for appropriate inventory index each time.
To solve this issue there is possibility to create macro – a hotkey which will perform several actions when you press a single key. Lets make a macro for quaffing Cure Light Wounds potion when we press F1 hotkey:
- press % to enter macro menu
- press
hto create ‘Keymap by item‘ macro - press a key on which bind to macro:
F1 - select item – Cure Light Wounds potion, in our case it will be
c - you will see action:
[Escape]q"Cure Light Wounds" - press
-to finish macro creation - press
yto save the key - press
b(‘Save keymaps to file‘) - press
Enterto confirm saving - Now, press
Escto get out of the menu and back in the game.
Now when you press F1, and you will drink Cure Light Wounds potion.
As you saved your macro to the default file when pressed b, it will be autoloaded every time you play with character with your current name. So even if your character would die – next character already will have this hotkey saved, so you need to setup it only once.
Dungeon Bracket system
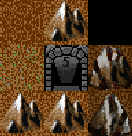 When you play Tangaria, you often must make a choice – to continue adventure in the dungeon or to return back to town. Each dungeon got maximum level restriction after which you can’t enter it, so if you will get CL6 when you are in DL5 dungeon (see number at dungeon entrance, eg at the picture to the left it’s “5”) – you won’t be able return back to this dungeon if you will exit it. It’s quite often situation when you have to leave the dungeon without killing its boss (who may have valuable loot) because of the dangerous situation or lack of consumables. Be smart, don’t kill everything on sight and you will be eventually rewarded.
Which monsters should I watch out for?
The answer is… all monsters. Any situation, when out of control, can be deadly. However, some monsters have a reputation for being responsible for more players kills than others, like Dark Elven Warlocks (DEW). If you haven’t fought certain monster before, and meet it/them for the first time, then you should be very cautious. Monsters appear in the earlier stage of game:
kobold      Can be nasty in the beginning (esp Large ones)
people      Novice rangers etc. Beware of special attacks.
worms       They breed. Rid'em before that, or run...
lice        They breed too. Itchy.
canine      Jackals or wild dogs. Often herd.
            (Beware they can be Maggot's dogs)
spider      Be careful, they can move very quickly!
eyes        Can paralyze you; never hit them in melee.

bat         No Problem (NP).
feline      Could be dangerous because of high speed.
reptile     NP.
jelly       Immobile. Throw rocks!
mold        Immobile too.
mushroom    Same as above.
itchy thing Not dangerous.
townspeople Live in town areas; some are dangerous.

traps       Not a monster.. Hard to avoid at the beginning.
What to kill
- uniques with good drops (Bullroarer, Brodda, Wormtongue);
- easy kills that are likely to drop something worthwhile;
- beware over-leveling, sometimes you can increase your character by several levels in a single battle; if you will get too high rate of level ups you will pass certain dungeons and don’t get the loot from its’ bosses.
What to ignore
- monsters that will damage or destroy gear (jellies, ooze, water hounds, etc);
- non-valuable monsters that are likely to use up consumables (baby bronze dragons, groups of spell-casters in line-of-sight, etc);
- mobs that you can’t dominate;
- uniques with escorts you can’t dominate;
- monsters at shallow depth. Drops for any given monster get better the deeper you go. Killing a novice mage at dl 1 generally gives nothing; at dl 20 he’s likely to drop something worth hundreds of gold. Wormtongue has, on average, a noticeably better drop at dl 20 than dl 10;
- Things that waste effort (run-away breeders, low-EXP monsters with no drop. Just close the door and move on).
What to avoid
Anything that can kill you in a single turn.
Plan to go deep
Try to get a light weapon that gives you the maximum possible blows, with the highest dice available. This is generally a Rapier, Main Gauche, Dagger, or Whip.
To survive you will want to have consumables:
5+ Phase Door scrolls
Word of Recall scroll
5+ Cure Lesser Wounds potions
Potion of Heroism or Boldness (for protection from fear)
Ranged attack to soften up a (single) unique:
- ~5 Flasks of Oil to kill dangerous and/or valuable monsters (throw oil for damage with the
vthrow command followed by'to target closest monster); - ~10-20 rocks to throw at non-dangerous monsters with annoying side effects (stat drainers and acid damagers that are between you and the stairs down). Shots can be reused, but oil can’t;
- extra arrows for a Archer. Note that missiles will always break when your character is still level 1, so don’t hesitate to buy a lot at start. Shoot arrows with the
hcommand.
Armour:
Don’t bother buying armour right on – it’s very expensive in comparison to AC. You will find it in the dungeon soon enough. Your starting equipment will include more than enough food and illumination for the first trip down.
When You Die
Playing Tangaria is an art to make right decisions to survive. Key to surviving is to keep in mind your past mistakes and try not to repeat them again. Eventually you will learn monsters and their properties and will know which of them is dangerous in this particular situation. You will learn the most important roguelikish skill: deciding should you fight or flee in this particular situation.
This is rule number one: don’t take unnecessary risks. If you often take enough low-probability chances of death, you’ll never survive to fight the Dark Lord. Such deaths are generally called ‘stupid’ (so YASD means “Yet Another Stupid Death”), but that’s not always accurate. Sometimes it’s just bad luck. But given enough chances, you are guaranteed to receive it. It’s the trick to extremely fast dives: the fewer moves you make, the less chance anyone of them will be fatal, even if on average, your individual moves are riskier than in a slower play. But the strategy applies more generally: unless you are exceedingly careful in play, messing around long enough at any one depth guarantees that something bad will eventually happen.
Tangaria is a very harsh game, in that the character you’ve been playing for days could be killed by a single careless action. Playing when tired or drunk is probably a good way to leave yourself with nothing but a sad tale to share in Discord. If you have the ability to sense monsters or traps then use it. This is particularly important when you begin to encounter monsters that, without the appropriate gear, will kill your character in a single move.
Remember, there is NO RULE that you have to clean out a dungeon — AT ALL. See something you can’t handle? Don’t be afraid to leave — NOW. Sure you could try to avoid it, but then again, it could be a hummerhorn. Half way through the level? You can still LEAVE NOW. Nearly finished with the level? You can still leave NOW. Think of it as a tactical strike, not a genocide mission.
You should pay more attention and not get yourself in a next turn = death situation, but this is not always avoidable and no one (presumably) is so meticulously patient. ALWAYS carry “escape” (get away) items — Phase Door, Teleport, Recall, Teleport Level, etc. When you can, stockpile those that work NOW. If a unique starts chasing you, you don’t want to be waiting for Recall to kick in.
You should seriously consider a quick escape if dealing with a situation in which monsters are breeding explosively. Some classes, such as mages, are more easily able to handle these though the use of spells that affect multiple monsters simultaneously, but even they should consider leaving if it becomes apparent that the monsters are breeding more quickly than the player can kill them. Even if you’re on a streak diving through the dungeon, step back and reassess whether you want to return to an earlier level — you never know what could be lurking around the corner.
But remember that the most effective way to learn how to play is… dying. Don’t be afraid to throw away characters — DIVE aggressively until you get a good feel for your character. Try different classes and races combinations!
Getting back to town
Town (daylight surface) is at a depth of 0 feet. Depth in Tangaria is in feet, up to 10,000 feet. Morgoth (main boss) can be found at 5,000 feet. Each level down in the dungeon is +50 feet.
To get back to the surface, go back to 0 feet. If you are on the first dungeon level, 50 feet, find the up staircase, stand on it and press <. There will always be at least one up and one down staircase per dungeon level, except first dungeon which has only one level and last levels of the dungeons.
You can also get back to the surface by reading a Scroll of Recall. When your character is 10+ level and you go deeper in the dungeon this is the preferred mode of transport. Reading a Scroll of Recall while not in the dungeon will take you down to the deepest depth you’ve visited in the dungeon. You can recall to a specific depth by inscribing your recall scroll with ‘#xxx’ where xxx is the depth in feet (e.g. #-R1600 will recall you to 1600 feet).
The town surroundings contains many different kinds of people. There are the street urchins, young children who will mob an adventurer for money, and seem to come out of the woodwork when excited. Blubbering idiots are a constant annoyance, but not harmful. Public drunks wander about the town singing, and are of no threat to anyone. Sneaky rogues hang about watching for a likely victim to mug. And finally, no town would be complete without a warm of half drunk warriors, who take offense or become annoyed just for the fun of it (there are assumed to be other people in the town, but they are not represented on the screen as they do not interact with the player in any way).
Most of the townspeople should be avoided by the largest possible distance when you wander from store to store. Fights will break out, though, so be prepared. Since your character grew up in this world of intrigue, no experience is awarded for killing the town inhabitants, though you may acquire handful of coins.
Town is an important place because you put to storage or sell to other players for gold valuable objects you’ve found as well as purchase necessary survival items (potions, scrolls, weapons, armour, etc). NPC store owners will not sell known harmful or useless items. All items which shopkeeper selling is identified. You can use this feature to learn item flavours.
The price that the shopkeeper requests is dependent your charisma. Please note, that NPC stores will not buy items from the player; only players can buy items from NPCs. Don’t worry about it, you will get enough gold from the dungeons; also you can trade with other players.
Stores do not always have everything in stock. As the game progresses, they may get new items so check from time to time. Stores restock after some game turns have passed, but the inventory will never change while you looking at it. You step away from shopkeeper for the store to restock. If you have a lot of spare gold, you can purchase every item in a store, which will induce the store owner to bring out new stock, and perhaps even retire. Some of NPC stores (in brackets you see the number of the store in ASCII graphical mode):
- The General Store (1) sells foods (rarely), some clothing, torches, oil, shovels, and basic ammo.
- The Armoury (2) is where the town’s armour is fashioned. All sorts of protective gear may be bought here. Sometimes you can meet stocked in the armoury quite exotic equipment, however, some armour types will never appear here.
- The Weaponsmith’s Shop (3) is where the town’s weapons are fashioned. Hand and missile weapons may be purchased here. As with the armoury, not all weapon types will be stocked here.
- The Temple (4) deals in basic potions and scrolls, some approved priestly weapons, as well as prayer books.
- The Alchemy shop (5) deals in all types of potions and scrolls.
- The Magic User’s Shop (6) deals in all sorts of rings, wands, amulets, staves, as well as magic books.
- The (Expensive) Black Market (7) will sell anything at extortionate prices. However it occasionally has very good items in it. With the exception of artifacts, every item found in the dungeon may appear in the black market.
- The Tavern (8).This is a place to stay safely. No monster will ever be able to enter the Tavern, and fights between players are prohibited in it. Tavern-keeper may sell to you some refreshments.
- The Bookseller (9) holds supplies of the simpler books needed by magic users; but it won’t sell the more advanced books which can be found only in the dungeon.
- Storage (0). This is your house where you can store objects that you cannot carry on your travels, or will need at a later date. Storage space depends on your charisma (“You’ve used all the space which you were able to bargain with storage keeper”), so some races might have there quite limited space.
So… You’re back to town alive? Very good 🙂 If not – just start a new character. Eventually you’ll make these round-trips between town and dungeon, gradually deeper… So, if you are alive after visiting the dungeon, you may try to find way to town (to real town, not to a tavern in which you first time appeared) – it’s somewhere on the north. There you could buy new items with that money you earned. Many people buys the items like:
- potion of Cure Serious Wounds: cures HP, confusion, blindness, etc. You could also buy its lesser sister – Cure Light Wounds, they are alright for <10 level.
- potion of Heroism: Boosts your fighting power. Also removes fear (during fear you can not attack monster in melee).
- scroll of Phase Door: short teleport. Used to run from enemies.
- scroll of Word of Recall: Reading this in dungeon will teleport you back to the town, and visa versa.
Identifying items
Most items found will initially be unidentified. Characters able to pray or cast spells will later develop the ability to identify items. Others will have a stack of Scrolls of Identify for such purpose. But in the early stages of the game these are expensive, so it may be more cost-effective to try to ID the items just by wearing/using them until you can afford to regularly purchase scrolls. Weapons and armour can be identified by being worn and used in combat, and most can be removed if found to be of poor quality.
Staves, rods and wands can often be identified by being used against monsters, but be aware that some of these magical items can have negative effects. Only use this approach when facing easily defeated monsters. Consuming unidentified potions and mushrooms is very risky, so it’s best to either identify them yourself or use them in the town. Ammunition can normally be identified by being thrown or fired at a monster, and typically the worst thing that can happen is that the attack does little damage to the monster. As with staves, wands and rods, do this when facing a monster than can be easily defeated.
Scrolls can normally be identified by being read, but some scrolls have negative effects. Your character may have a very short life if they read a scroll that summons a horde of undead monsters. If using this approach, it’s a good idea to position your character on top of some stairs so you can quickly escape if a mysterious scroll leaves your character surrounded by monsters.
With weapons and armour, your character may in time be able to roughly gauge the value of an item by keeping it in their bag while they explore the dungeons.
Suppose you have acquired these stuffs:
a pink potion
a scroll labeled ‘khobit san’
a dagger (1d4) ???
a filthy rag [1]
a balsa wand
All of them are in ‘unidentified’ status. Potions and scroll can not be identified by Identify scrolls, so you need to ‘try’ them anyway. Also Identify scrolls are very rare, so the best way in earlier games to ID items is to just use/wear this items to see what they do. Once identified, the stuffs above will be shown like:
a Potion of Blindness
a Scroll of Phase Door
a Dagger(1d4) (-3,-5)
a Filthy Rag of Resistance [1,+8]
a Wand of Light (22 charges)
Now that you know what they are. Potion and Dagger not really good and Filthy Rag is awesome 🙂
Potions and scrolls need to be identified only once per game. Items with several magical properties (like weapons and armours) might need to be identified several times as every magical property got its own “rune”. When you identified the particular rune onces – you will recognize this rune at other equipment too.
For example, you have unidentified magic cloak (???). Kobold shaman hit you with fireball – and cloak will become identified as cloak of fire resistance. Each property (“rune”) will be identified by corresponding impact… or by reading Identify scroll 🙂
You may have ‘feeling’ of unidentified weapons and armour you’re carrying. This ability depends on your class and level. It’s called ‘pseudo-identify’. Just carry equipment around in your bag for a while and you will get the idea – is it ‘good’ or ‘cursed’ item.
Please note that in Tangaria you don’t need sell items to NPC (and they won’t buy from you anything as they consider items from dungeons as ‘unclean’ ones). But you will find more than enough gold in the dungeons and you will be able to spend it in town to buy equipment and acquire services (NPC doesn’t look at the gold as at something ‘unclean’ obviously). At the same time you are welcome to trade with another players! Build a house and open your store 😉
Item damage/attack modifiers
Soon enough you will find magic items which got mystical numbers in brackets 🙂 Some examples:
Pike (2d5) (+2,+3)
— this pike gives basic damage of 2d5 (two 5-faced dice) when hit;
— +2 bonus for chance to hit and +3 bonus for damage.
Thus this pike will give 5-13 (9 in average) damage when hit.
💡 Note that light weapons (<10 lbs) may bring extra attacks per turn and heavy ones has ability to land critical hits.
Leather Scale Mail (-1) [11,-1]
— wearing this armour gives 11-1=10 armour class (AC)
— reduces to-hit by -1 (because of encumbrance).
AC modifier can get lower like this due to acid etc.
💡 Heavy armours can reduce your to-hit and mana, especially in the earlier game.
Pair of Gloves of Slaying (+5,+4) [2,+4]
— this armour gives 2+4=6 AC
— +5 to-hit and +4 to-damage.
💡Attacking modifiers on gloves are used only in melee (and not in missile attacks).
Beaked Axe of Westernesse (2d6) (+9,+13) (+2)
Hey, it’s pretty nice weapon for new player…
In this case, (+2) signifies bonus to Strength, Constitution and Dexterity!
💡 You may want to investigate such items further with Scroll of Identify.
You have -1+5+9=+13 to-hit and 2d6+13+4=24 average damage if wielding this weapon together with previous armours (Leather Scale Mail and Pair of Gloves of Slaying).
Long Bow (x3) (+4,+7)
Firing with this bow gives +4 to-hit, +7 to-damage; and the damage is multiplied by 3. It means that it will make 21 damage per shoot.
arrow (1d4) (+0,+0)
If we will shoot this arrows with previous long bow we will have:
+4 to-hit and (1d4 + 0 + 7) x 3=28.5 damage on average.
arrow (1d4) (+7,+9)
+4+7=+11 to-hit and (1d4+9+7) x 3=55.5 damage on average!
So, sample model:
(xdy)(+a,+b)[c,+d](+e)
(xdy) is the basic damage of a weapon. x of y-faced dice.
+a is to-hit, +b is to-damage modifier.
c is basic AC(fixed) and +d is modifier(variable). The higher the better.
(+e) concerns the special ability of that item.
Spellcasting
💡 If you want to play warrior for now – you could skip this section.
All classes but Warrior, Monk, Archer and Unbeliever can use some form of magic/prayer. You may try to play a spell-casting class, though they are much harder to play for a new players.
To study or use magic you need magic books and to be able to read them. Magic related commands:
b– browse a bookG– gain a new spellm– cast a Magic spell
You can learn new spell when ‘Study’ status is shown at the bottom of screen. You can learn more spells as you gain levels, but it’s not always that you can learn every spell under your level (Int/Wis affects this).
Let’s suppose you are a Mage and have the book,
a) a Book of Magic Spells [Magic for Beginners]
Browse your book first. Press b1 and you’ll see something like this:
Name                             Lv Mana Fail Info
a) Magic Missile                  1    1  17% unknown
b) Detect Monsters                1    1  18% unknown
c) Phase Door                     1    2  19% unknown
d) Light Room                     1    2  21% unknown
e) Find Traps, Doors & Stairs     3    3  31% difficult
f) Fire Ball                      3    2  28% difficult
g) Lightning Beam                 5    4  47% difficult
From left to right: sign to specify the spell, name,
Minimum level required to gain that spell, MP (mana) spent when casting,
possibility to fail casting and status/effect of the spell.
When learn/cast a spell, you should specify the book and then spell.
In this example, press G1a to learn “Magic Missile” and m1a to cast it (then press ' to project it to the closest target).
💡 Priest/paladin cannot choice the spell to learn; they can only choice books.
Generally you should make hotkeys (macroes) frequently-used spells. Tangaria being real-time, shortcutting key-strokes are crucial for survival. The most important role of macros is to allow you to get out of crisis with only one key-stroke. Macros are also indispensable for spellcasting and missile attacks. Let’s create macro for our first spell, so when we will press F5 key – it will shoot a Magic Missile to closest monster.
💡 Please note that before you will be able to macro spell – you must learn it with G command!
- press % to go to the macro-screen
ito “keymap by spell”1to select bookato choose which spell to cast – macro command will automatically created-to finish macro creationyto save this keymapb(“save keymaps to file”)Enterto confirm savingEscto get out of the menu and back in the game.- now when you press
F5– you will cast cast “Magic missile” and it will be fired to closest monster.
Party (playing in group with other player)
Have you noticed that most of the corridors in Tangaria have width of 2?
                                    #....
			    #########.....
			    ..oooo@.'..(..
			    ..ooooo.'.....
			     ...##########
Yes, this fact makes it hard for you to fight with horde of enemies… unless you fight them together with your friends.
Press @ to see the players-list:
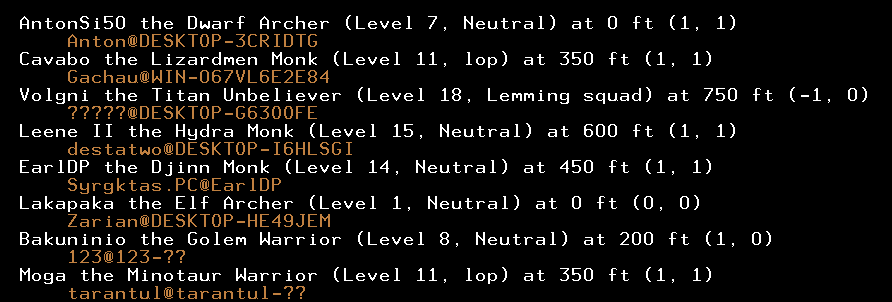
In the example above, the player ‘Volgni’ belongs to the party ‘Lemming squad’.
It says ‘Neutral’ if he doesn’t belong to any party.
If there are already some parties, you can ask them to let you join; otherwise you might wish to band a new party. Anyway everything starts from chatting; communicate!
And here’s how to band a party:
You’ll do all the operation concerning parties with Shift+P key.
Party commands

     (1) Create a party
     (2) Add a player to party
     (3) Delete a player from party
     (4) Leave your current party
     (5) Specify player to attack
     (6) Make peace
Choose 1 to create a party; you’ll be prompted for party name.
Now you’re the owner of this new one-man party.
Then press 2 and input the name of player(s) you want to add.
Press Esc when done.
How this party works?
- The members can know the location of other members easily; @ command will show the members’ depth, and screen with
Lcommand will displays the members if they’re there regardless of line of sight;
💡 This can be also used to avoid exploring the same floor. - Players can specify a party name as destination of chat.
eg. typing as following will send message only to members of party ”Lemming squad’:
Lemming squad:orcs ahead!
💡 You may consider to create party with short names so it will be faster to communicate. - Party members on the same floor will share the EXP they earned;
First, EXP is calculated as if the highest-level member killed it.
And then that EXP is divided equally to all the members there.
💡 This won’t work if members’ level differs more than 7. - Some assistant magics can be used on party members.
Note that the members don’t have to act together all the way.
A member can leave the party with 4 of party commands; if the owner leaves the party, the party is disbanded and all the members become “Neutral” again.
The party owner can purge his member with 3
And wow, with 5 you can even declare the war! Specify the player or party name to attack; they will be handled just liked monsters (eg you’ll attack each other automatically when standing side by side)! To be able to attack player – he also should declare the war toward you. But be advised, never do this indiscreetly!
💡 Failing to steal also make the target hostile.
You can make peace with hostile players by command 6.
Some more commands!
In the beginning you saw some essential commands. There are some more to remember:
Locate player (move vision area around)
Ctrl+l Centre map on player
Activate an object
aim a wand
use a staff
Use an item (food, potion, scroll, wand, staff, etc)
zap a rod
close a door
open door/chest
Disarm a trap/lock door
_ Drink/fill (fountain)
I Observe an item
Fill a lantern (with oil)
fire an item from quiver
v Throw an item from inventory (to switch to quiver press |)
' Target closest monster
x Swap equipment (inscribe two items with @w0 to do so)
y Use dragon breath or special ability if you are polymorphed
@ See who is connected
$ Drop some gold
= Edit your preferences
H Buy a house
/ Monster info search
~ Check knowledge
There are a lot more commands, see next chapters!
Quitting & Saving
To exit the game, use Ctrl+x. You should always exit in Town. Your character will leave the game immediately when you are in Town. If you save while in the dungeon, there is a “timeout” before your character is actually saved and your character stays in the game for some seconds. It’s enough to get you killed since the server continues to process time while you’re not in front of your char. This prevents players from quitting right before they die. Anything could happen during those seconds as your character is on ‘auto-melee’ mode and cannot do things such as run, heal, teleport, etc.
If you wish to quit your character altogether and create a new one, use Shift+Q which is the terminate character command. Your character will be permanently deleted, although your character name and password will be saved so no one else can use it.
💡 Remember: when you terminate your character – it’s gone forever.