Tangaria is pretty complex game, and it may be difficult to grasp everything at first attempt, especially if you have never played a classic roguelike games like Angband or NetHack before. Some adventurers would probably want to browse through all of the guide pages before beginning any serious journey.. But at the same time you could just dive into the game and learn everything by yourself — to help you with this way there is a list of game commands, which you could open by pressing ? key while in-game.
💡A key resource for Tangaria players is Discord, where you are welcome to ask for a help, and also post compliments, complaints, suggestions, bug reports, and interesting experiences.
Connect to the server
For this quick demonstration we will assume that you have never played classic roguelike games before. The following instructions are for demonstration purposes only, and so they could be intentionally a bit boring 😉
Once you have started the game with mangclient_sdl.exe, you will be asked to enter your account name. Since your account will be saved on a distant server, you will also be asked to provide a password to protect your account. If you don’t have an account yet, one will be automatically created for you with the password you provided.
💡To save your login/password, fill it in config file: mangclient.ini
Character creation
Once you have entered login/password, you will see empty list of characters from your account. Press a to create a new character, then enter your character name and press Enter.
💡If pressing a doesn’t work – it could mean that you have non-English language layout active; please switch your input language to English. Or you might have Caps Lock turned on (please turn it off then – as case of a letters matters in Tangaria).
At the character creation screen, you will be prompted to select the race and class of your character. For this demo, choose Male Half-Troll Warrior (press a three times).
💡If you do not like to play warrior, you may consider to try Monk who does not use weapons and prefer light armour for martial arts combat.
Now we should distribute our stats. Press Enter to choose the "Point-based" roller, and use arrows keys to manually increase your attributes. For a warrior it’s recommended to have at least 18/30 STRenght to have high number of attack per round; then put some points to DEXterity and CONstitution; rest (if any left) could go to other stats of your choice.
💡STR and DEX determine number of your blows per round (BpR). In most cases the lighter weapon you have – the more BpR you will inflict with it. So fighting with a dagger or whip at the beginning may be a very good idea. Another important stat for warrior is CON as it affects your hit points.
First glance
When you’ve finished with assigning stat points, press Enter twice and after a little pause press Space. Your character will appear inside of small tavern to the south from town. You may appear during daytime, but note that the sun rises and falls (rather instantly) as time passes. Starting location contain a little inhabitant, most of them are harmless animals. Later on you will be able to get to town which located to the north from starting tavern. Town may have different buildings, some townspeople, and different terrain.
You should now be looking at such screen (if it’s night, you will see darkness outside of walls):
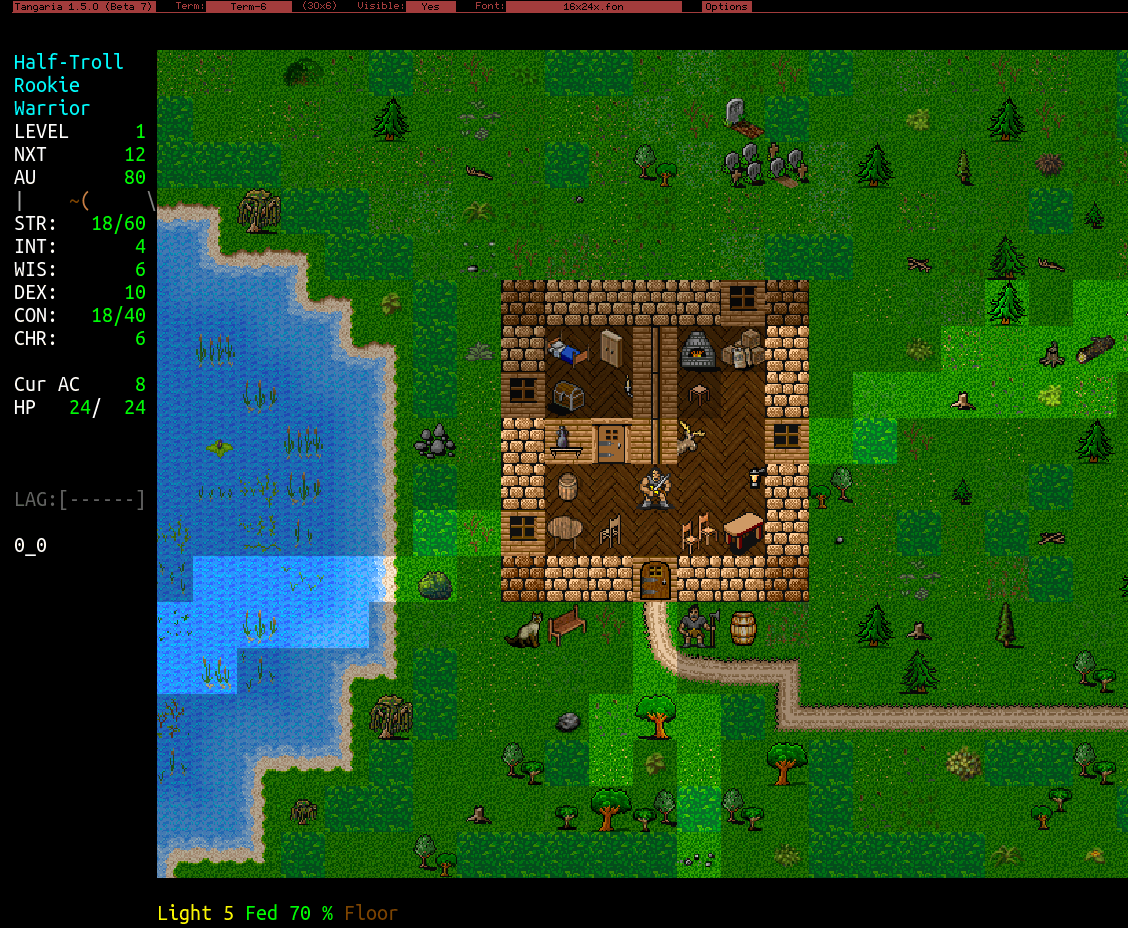 Main window is divided into two parts: status bar (to the left) and the game window (graphical main side). Status bar contains numerical information about your character:
Half-Troll   - race
Rookie       - title (decorative; change every few levels)
Warrior      - class
LEVEL      1 - level (gaining level award you with bonuses)
NXT       12 - how much experience you need for next level
AU        80 - gold amount. You don't have it in inventory

STR:   18/60 - strength. Affects fighting, carry weight
INT:       4 - intelligence. Mage's stat, traps, etc
WIS:       6 - wisdom. Saving throw and priest/paladin stat
DEX:      10 - dexterity. Fighting, dodging, stealing
CON:   18/40 - constitution. Hitpoints, vitality
CHR:       6 - charisma. Character's personality

Cur AC     8 - armour class (higher is better)
HP        24 - hitpoints (if reach 0, your character dies)
[********--] - monster HP bar (if monster close)
LAG:[------] - internet connection status
0_0          - x,y coordinates; if go east - will become 1_0

Light 5: light radius; Fed 70%: satiation; Floor: floor type
💡Floor – shows at which terrain type you are standing. Some terrain may be dangerous, eg you can drown in the water, burn in lava, fall into pit, etc.
Also there is a line status bar at bottom – sometimes you may see some more indicators there. One of the most important is speed which telling how fast your character can move, fight or perform any other action. In case if you don’t have bonus or malus to the speed – you won’t see this indicator. But if your speed gets increased (eg by drinking a potion of speed) – you will see a green indicator, eg Fast +10. If your character loses speed, eg by overeating or by carrying around too many heavy items, you will see a light brown indicator, eg Slow -2.
Where am I?
First lets look around: press l → p → move a cursor around by pressing arrows or (better) Numpad 1-8 keys. Later on you will mostly use l command without p – then the cursor will be moved onto only “interesting” square (containing monster or item).
💡Press ? → a to see list of available commands.
Now exit ‘look’ mode (Esc) and press i to display your character’s inventory. You are carrying some objects to help you to survive — some food, potions and scrolls:
a) a Maggoty Bread               0.8 lb - 'E' to eat
b) a Potion of Cure Light Wound  0.4 lb - 'q' to quaff
c) a Potion of Berserk Strength  0.4 lb - increase attack
d) 4 Scrolls of Phase Door       2.0 lb - short-teleport 'r'
e) a Scroll of Satisfy Hunger    0.8 lb - gives satiation
f) 2 Scrolls of Word of Recall   0.8 lb - teleport to town
g) a Wooden Torch                2.2 lb - 'w' to wield
💡Note that your inventory is always kept sorted in a semi-logical order, so the indexes (a, b, c, d…) of some objects may sort in a different order as your inventory changes.
When you are done checking your inventory, press Esc to return to the normal game view. Now press e to see what equipment you are wearing. You will find you are
– wielding a club at slot a)
– lighting the way with a torch at slot f)
– and wearing armour on your body at slot g)
You have several other equipment slots but they are all currently empty:
a) Wielding      : a Club (1d3) (+0,+0)          3.5 lb
 ) Shooting      : (nothing)
 ) On right hand : (nothing)
 ) On left hand  : (nothing)
 ) Around neck   : (nothing)
 f) Light source  : a Wooden Torch (5000 turns)   2.2 lb
g) On body       : Soft Leather Armour [8,+0]    8.0 lb
 ) On back       : (nothing)
 ) On arm        : (nothing)
 ) On head       : (nothing)
 ) On hands      : (nothing)
 ) On feet       : (nothing)
 ) Using         : (nothing)
Lets press t to take off armour, then choose appropriate ‘on body’ slot – press g. Note that the armour is no longer shown in the equipment and item will be returned to your inventory. Press w to ‘wear/wield’ it back and observe that the inventory listing is reduced to this item.
To move your character around it’s better to use the NumPad (section on the right part of the keyboard) than the arrow keys, as it allows you to move diagonally too, which is crucially important.
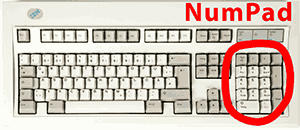
💡Don’t worry if you don’t have NumPad section at your keyboard – there is a special layout to play without it; check No-NumPad
Practice moving around using the NumPad:
Let’s buy something
Your character will begin his adventure with some basic supplies, and some extra gold with which you can purchase more supplies from tavern keeper (or from mage-hermit who lives to the south-west from tavern).
Come to the tavern keeper who is staying outside of the tavern. To interact with him just “walk” into his direction while standing close. Once inside a store, you will see the name of the store owner, the name of the store, and the store inventory, listed along with the prices. Press ? to see a list of available commands in store. Note that many of the commands which work in the dungeon work in the stores as well, but some do not, especially those which involve “using” objects.
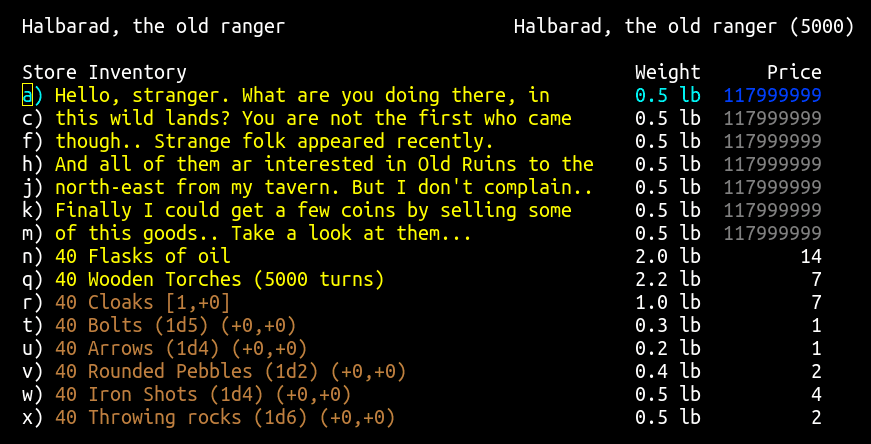
💡Press ? to see list of available commands in shop.
You can use the space or arrow keys to scroll the list of objects. One of the items sold here are Throwing rocks. Lets buy some. Press the p key to purchase → x . You are asked how many you want; press 40 and hit Enter to buy them. Rocks are very good for a new characters, because they could be thrown at monsters from a distance with h key. Press Esc to leave the store.
💡Note that if you will open inventory now, you won’t see there rocks which you bought; they are stored in separate place, in quiver – press | to see quiver list.
Time to run
In Tangaria there are a lot of different monsters, where the word “monsters” specifies a wide variety of entities, including people, animals, plants, etc. Only a few “races” of monsters normally appear in town, and most of them are harmless (but avoid any mercenaries or battle veterans if you see them). The most common “monsters” in town are small animals (cats and dogs) and townspeople (merchants, mercenaries, miscreants, etc).
Now it’s time to explore surroundings and try to find an entrance to the dungeon. While you are in first location – you are relatively safe, people and animals there less likely to attack you.
After you have got the hang of these movement commands, practice running. Press shift followed by the NumPad direction to run in. Running makes movement in much faster and easier but only works when no awake monsters are within your character’s line of sight.
💡Running often requires that NumLock is turned off (press the ‘Num’ key above your NumPad, so the green light is off). If Shift + <direction key> doesn’t work on your system, you can press the dot . followed by a direction key to run.
Follow the road which leads to the east from tavern and turn north from crossroads until you will find the dungeon entrance:
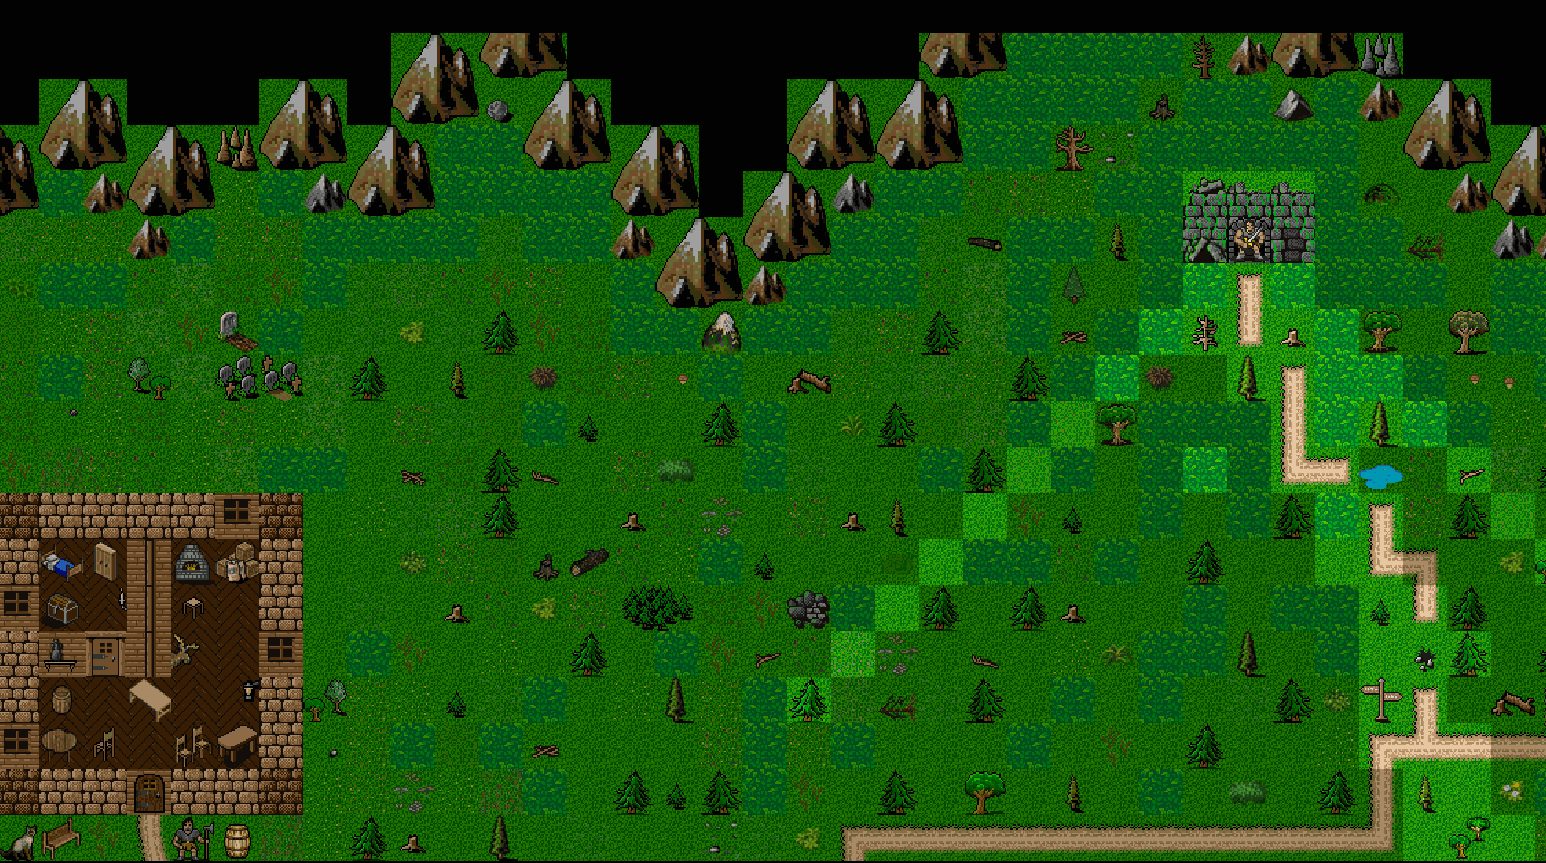
Now position your character over the staircase to the dungeon and press > (Shift + .) to go down the stairs. At this point, you are in the dungeon and you will see something like this:

Dungeon
Note that when you use stairs – you fall through the ceiling. So when you appear inside of the dungeon – you can’t use the same a staircase to get back to the surface – you have to find a new staircase up. So now you know that by using the > command you go down the stairs and < bring you up.
Now, look at the screen. Your character may be in a lit room or in a dark corridor. You may see some closed doors or some open doors or some open exits in the walls. If there are any closed doors you can walk into them to open.
Lets explore the dungeon. You will notice that as you moves around, the screen keeps displaying some of the grids that your character has seen. Think of this as a kind of “map” superimposed in your memory.
Note how the game window automatically scrolls when your character gets close to the edge of the window. If you approach the edge of the game window and the game window does not scroll, then you are approaching the edge of the “map” portion.
💡 You can use the L command → <directions> to look at other pieces of the map and Ctrl+l to centre map; press ESC to exit ‘look’ mode.
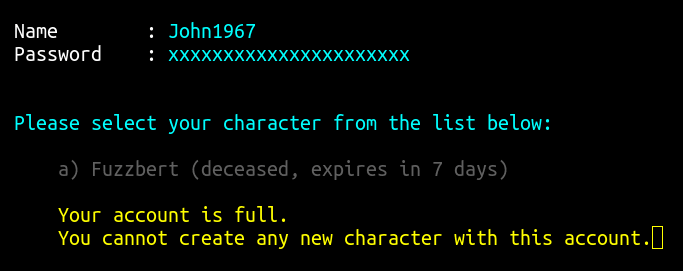 Although unlikely, it is even possible that your character has already been killed. When you die – you loose your character together with all of your gold, inventory, and equipment. If it happened simply start a new character: relogin to the game and press
 a to select your deceased character; now you will be given a quick-start option to generate a new character obeying the same constraints (reroll or reincarnate) or you may want to start completely anew: to do so – choose to delete old character, relogin and create a new one.
💡 If you died – don’t get discouraged. All new players die… a lot. It’s the way how you learn to play roguelike game. Each time you encounter new situations and die in various, sometimes unbelievable ways – and get knowledge about it. Most important skill which you get during playing roguelike is ability to decide – should you fight or flee in this particular situation. As you get more experienced, you will become much better at surviving, and may even live to see level 20! So.. if you died – just delete old (dead) character and create a new one.
When you will meet monsters — to attack them walk next to them and stay still; then your character will attack the monster in melee automatically. Wait until you kill the monster, or it runs away.. or you die. If you die, just start a new game. If the monster runs away, ignore it, or chase it. Remember that you can attack monsters from the distance by throwing rocks with h key.
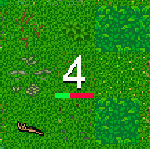 Your character could change appearance to a “number” if you’re hurt, for example
 4 indicates you have 40% of HP remained. If it’s happening while fight is still active – quaff a healing potion. If there are no monsters around – better to save potions for later and use “rest” command: R → & → Enter, it will speed up time until you have HPs regenerated.
|
We have new feature – hotkeys to control flow of time:
|
Exploring the dungeon is pretty straightforward: walk through the unexplored rooms and hallways killing monsters and picking up objects. Your character picks up gold automatically when you move on top of it. You can pick up items if you will stand on top of them and press g. To drop an item from your inventory, press d. Usually dungeon is reset when you climb up/down the staircase; so never leave the valuables behind.
As you explore territory, your actions will be recorded on the Message Window. If you missed or want to review previous messages, use the Ctrl+p command to see message log and press up-down arrows to scroll it (or Page Up/Down). If you are lost – hit M to see a large-scale map of the territory that you have explored (hit Esc to close map).
Once you have killed several monsters, you will gain next character level. Your max hit points and spell points (if any) will increase, as well as your skill attributes with each level you gain. Pat yourself on the back!
💡 First dungeon contains only one floor. To continue your adventures deeper, try to find another dungeon to the east. In case if you’ve forgot – to get back to the surface from the dungeon – find staircase up, stand on it and press <.
Once you feel tough enough, go outside to find different dungeons, where more dangerous monsters. At the end of each dungeon (except first one) there is a boss which could possible have valuable treasure.
 “Where to go after I’m too powerful to enter first dungeon?”
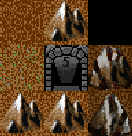
There is a system called dungeon’s brackets. Note that if you hit level 2 and exited first dungeon – you can not enter it again. On each dungeon entrance there is written a maximum level (at the picture to the left it’s “5”) after which you can’t enter this dungeon; if your character’s level exceeds this value – you should go to the next dungeon. To find where to go next you could take a speak-peak into the Map (click on it to see the directions).
Also nearby to the north (in next location) there is the town of Farfest which has plenty of shops and player’s houses where you can buy some useful goods.
Some more interesting keys to try:
Use an item (food, potion, scroll, wand, staff, etc);
I Observe an item in your inventory;
$ Drop some gold;
@ See list of players who’re currently online;
P Form a party with other players; you will share experience from killing monsters and can see each other even at long distance;
= Game options menu to edit your preferences;
/ Monster info search;
~ Check character’s knowledge and artifact/monster spoilers.
To setup volume of sounds/music for mangclient_sdl.exe client: check “Options” on top of the screen to the right (screenshot).
To exit the game, saving your character wherever he may be, press Ctrl+x. Better to do it only in town, not in the dungeon. If you don’t like your character and want to delete it, press Shift+q and double-confirm the following questions with y and @.
When you log on the game, all the other players online will receive a message:
<Your-nickname> has entered the game.
Don’t hesitate to say something. Press : (colon) to send a message to everyone online, for example :Hello! I'm new!
People may talk to you in turn (if any online). Those messages are shown in ‘Chat’ or ‘Term-1’ window (if you will close ‘Chat’ window). You can press Ctrl+p to read message history.
What’s now?
You now know enough to play a quick game of Tangaria. Now check the Guide chapter to learn more useful stuff which will help you to survive longer 😉